Overview
Authorized Users allow you to securely share access to your UPS Forwarding Hub profile with employees, vendors, logistics providers, or other trusted business partners. When you invite an Authorized User, you control what information they can access, including shipping accounts, address books, and rate visibility. You can update permissions or remove access at any time. Use this feature instead of sharing account credentials to help maintain security and visibility across your organization.
When to Use This
Use Authorized Users when you need to:
- Delegate quoting, booking, or tracking activities.
- Allow multiple team members to manage shipments.
- Grant temporary access to logistics providers or business partners.
- Control visibility of account numbers, rates, and address books.
- Remove access when a user no longer requires it.
Before You Begin
Make sure:
- You are signed in to UPS Forwarding Hub.
- You have permission to manage Authorized Users for the profile.
- The user's email address is available.
- Your profile has not exceeded the limit of 100 Authorized Users
- If your profile uses @domains, the invited user's email address matches an approved domain.
Make sure you understand:
- Profiles support up to 100 Authorized Users. Active users and pending invitations count towards this limit.
- Email addresses cannot be edited after an invitation is sent.
- To change an email address, you must remove the existing user and create a new invitation.
- Pending invitations expire if not accepted within the required timeframe.
- Access reviews operate on a page-by-page basis during annual reapproval.
- Users who remain pending after the review and extension periods may be removed automatically.
Add an Authorized User
Step 1: Open Authorized User Management
- Sign in to UPS Forwarding Hub.
- Select My Profile.
- Select My Authorized Users.
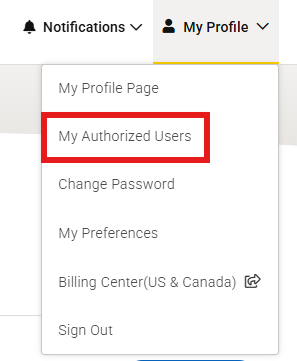
Step 2: Create an Invitation
1. Select Invite New.
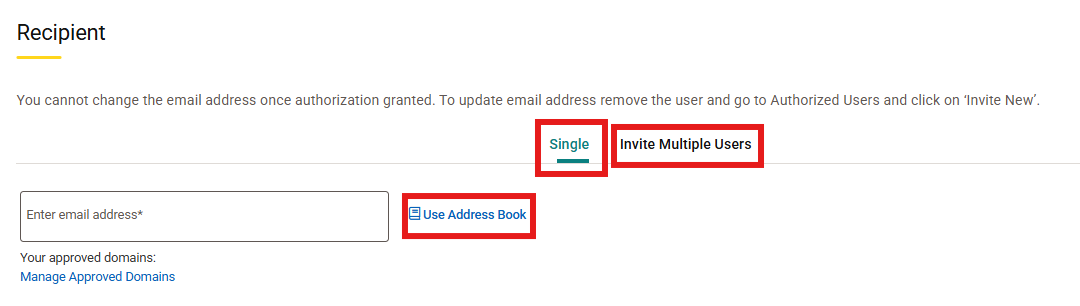
2. Under Recipient, choose one of the following:
- Single User: Enter one email address.
- Multiple Users: Select Invite Multiple Users and enter multiple email addresses separated by commas.
- Address Book: Select Use Address Book to choose an existing contact
Step 3: Configure Permissions
Before sending the invitation, choose the permissions the user should have.
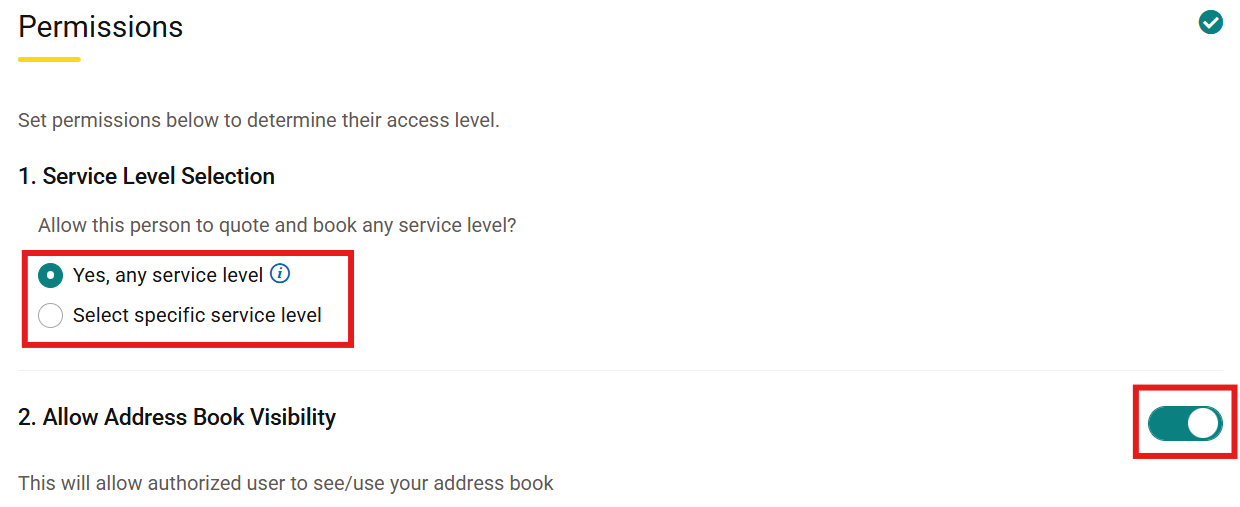
Service Level Selection
Choose specific modes of transportation and types of services the user can quote and book.
- Yes, Any Service Level to provide access across all available transportation services.
- Select Specific Service Levels to limit access to selected services.
Address Book Visibility
Choose whether the user can access saved addresses using the toggle.
- Toggle On: Users can view and use your saved address book entries
- Toggle Off: Users must enter addresses manually
Linked Account Visibility
Choose whether the user can access linked account numbers.
- Toggle On: Users can view linked account numbers
- Toggle Off: Users cannot access linked account information
Select Set to Mask checkbox to hide account numbers from the user's visibility
Rate Visibility
Choose whether the user can view shipment pricing and contract rates.
- Toggle On: User can see applicable rates
- Toggle Off: User can quote and book but cannot see rates
Personal Note
Optionally enter a message for the recipient.
Step 4: Send the Invitation
- Review the invitation.
- Accept the Terms and Conditions.
- Select Send Invite.
An email invitation is sent to the recipient to accept or deny the request.
Remove an Authorized User
Step 1: Locate the User
- Open My Authorized Users.
- Locate the user in the Active Team List.
- Search by name or email if needed.
Step 2: Remove Access
- Select the user's record.
- Open the Authorized User details page.
- Select Revoke to remove Authorized User.
- Select Confirm.
The user's access is removed immediately.

Edit Authorized User Permissions
You can modify an Authorized User's permissions without removing access.
- Open My Authorized Users.
- Select the user.
- Select Edit Permissions.
- Update settings as needed.
- Save your changes.
What Happens Next
When an Authorized User Is Added
- An email invitation is sent to the recipient.
- The recipient must accept the invitation.
- After acceptance, the user can switch between profiles using the profile selector.
- The user receives only the permissions assigned during setup.
When an Authorized User Is Removed
- Access is removed immediately.
- Access to shared accounts, address books, templates, and rates is revoked.
- The user moves to the Inactive Past Users list.
- A notification email is sent to the removed user.
When permissions are modified
- Updated permissions take effect immediately.
- A notification email is sent to the user.
Recommended Security Practices
To maintain UFH account security:
- Use Approved Domains: Configure domains to limit invitations to approved company email domains.
- Review Access Regularly: Review active users and remove access that is no longer needed.
- Download Activity Logs: Use download logs of all users (Last 7 Days) to review actions performed by Authorized Users.
- Complete Annual Reapproval: Authorized user access must be reviewed annually. When prompted, complete the review to validate active users and prevent unintended access removals.
Troubleshooting
Why can't the user see our account rates?
Open the user's permissions and verify Rate Visibility is set to Yes.
How does the user access my profile after accepting the invitation?
The user can sign in and select your company profile from the profile selector in the navigation menu.
Can I restore a user that was removed?
Yes. Create a new Authorized User invitation using the user's email address and assign the desired permissions.
Why is my invitation failing?
Verify that:
- The profile has not reached the 100-user limit.
- The email address is valid.
- The email domain is approved if domain restrictions are enabled.
Related Articles
Was this article helpful?
That’s Great!
Thank you for your feedback
Sorry! We couldn't be helpful
Thank you for your feedback
Feedback sent
We appreciate your effort and will try to fix the article